Did you ever want to make your very own website from scratch? Are you looking to build a solid website for adding more visibility to your business? Well, in either case, you need to start from the same place- from learning how to build your very first website. And guess what? In this tutorial, I’ll give you a detailed guideline on exactly what you want to know about building your very first website.
Having several years of experience in web designing, I’ve built many websites for clients in the last couple of years. Right now, my designs are used by hundreds of other web designers across the globe. But not all of us have the same technical expertise. And to be honest, that doesn’t really matter when it comes to building a website. Yes! You’ve read right! At this point, anyone can build a website. You don’t need to have any experience or technical skills to do that. With the wide range of incredibly efficient web designing tools and platforms- there’s never been an easier time to make a website on your own.
Like I already said, you don’t need any technical knowledge to get started. All you have to do is diligently follow the instructions I’m about to give.
In the following section, you will find a step-by-step guideline on building your very first website.
We will be building a website for all types of small businesses.
Contents

Step 1
Choose the right platform and ThemeGo to step 1
Step 2
Get a Domain Name ($ 14.95/year) and Web Hosting ($ 3.95/month)Go to step 2

Step 3
Setup SSL (https) for you domain (FREE)Go to step 3

Step 4
Install WordPress CMS system (FREE)Go to step 4

Step 5
Install the Divi theme ($ 89) and the free layout pack (FREE)Go to step 5

Step 6
Customize the look and feel of your websiteGo to step 6
Step 1: Pick the best platform
Before you even start out with your very own website, you’ll first need to figure out the right platform. This platform is more like a CMS (content management system) or software that’ll be used for running your website. So which is the best platform? As far as I am concerned, there’s only one viable and excellent choice, and that’s none other than WordPress.
But with so many content management systems out there, why am I specifically recommending WordPress? Well, this is because:
- It is free and can be used by anyone.
- Extremely easy to operate, even if you don’t come with any technical expertise.
- Lets you choose from several thousands of themes.
- Can be easily extended with plugins.
- One of the best content management systems.
- SEO friendly.
In addition to the mentioned benefits, WordPress also comes with regular updates. Being an open source content management system, the site is updated by several thousands of developers every time you find a glitch. So if you’re looking to work on a simple, hassle free and easy to operate CMS- WordPress will definitely be your answer.
Choosing the right theme
Your WordPress theme is extremely important because this will provide the front-end style of your WordPress website. Like I already mentioned, you can always make your pick from the several thousands of themes in the Theme directory of this software. But then again, if you’re looking to stay an edge ahead of competitors, you’ll also get the option of trying out premium themes like Divi.
Divi is currently one of the leading themes on WordPress. It is widely popular both among newbies and professionals. I personally love this theme for its simplicity and interactive interface. I’ve also used it on several hundreds of my websites. What I really love about Divi is its all-purpose feature which means you can easily build as many number of websites as you’re looking to build with this theme. Its hundreds of modules and customization option make it even more versatile.
As you try out Divi, you’ll be amazed by the number of free layouts you can try. In addition to this, it’ll also operate as a front-end page builder. This means, you can easily edit the website from a live view and customize it according to your preference.
Things to do before next step
Z
Choose a platform to build your website on. I’m recommending WordPress which is free and easy to use. This guide will continue with this CMS system.Z
For now, you don’t need to install or download anything. I’ll show you this in the next steps.
Step 2: Get a domain name and a Web hosting plan
In order to get started with WordPress or any other CMS, you will need two important things-
A domain name (which is the web address of your site, something like (thenameofyoursite.com)
Hosting (the service that’ll connect your online platform to the internet)
Choosing the right web hosting platform is perhaps one of the most essential parts of starting a website. Here, you should make it a point to choose a platform that is not only reliable and is backed by excellent customer support but is also equally affordable.
I would recommend Siteground as a hosting platform because of its simplicity and user-oriented services. Here are some more reasons that’ll convince you why I’m vouching for it.
- Lets you install WordPress in a single click.
- Free Let’s Encrypt SSLs (secures your website).
- Offers 24X7 customer support.
- Loads your website really fast.
- 50% discount
Now that you’re aware of the benefits this platform comes to offers, here’s how you can start out on Siteground:
Start Your Hosting With a 50% Discount For Just $ 3.95 Per Month.
Step 1
Go to the website of Siteground– In order to get started with this hosting solution, you’ll first have to head to the website of Siteground and click on the choose plan’ option.
Step 2 choose your plan
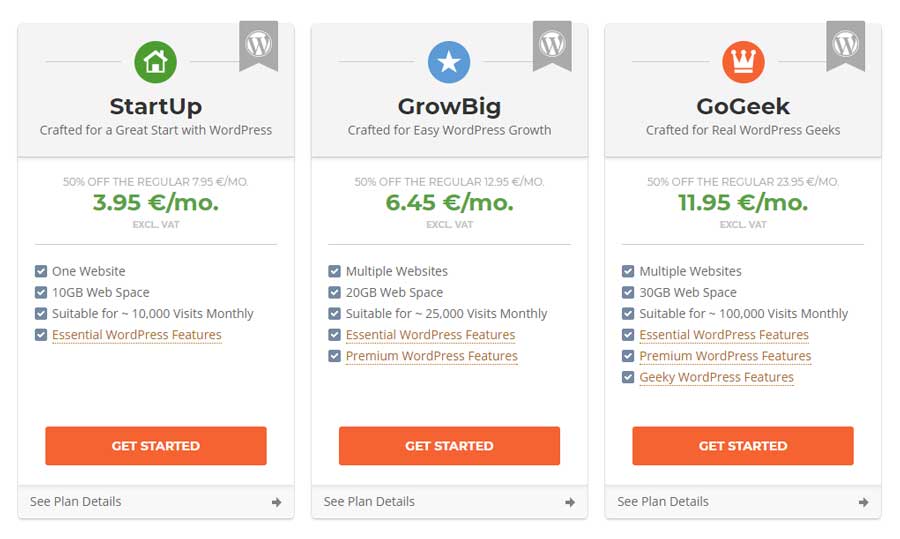
For this next step; you’ll have to decisively choose a hosting plan for your website. Having said that, don’t stress out about the different packages, because you can always upgrade them as and when you need. If you’re a beginner, you can always try the StartUp package. This is a great choice for new websites and right now it is available at a discount of 50%. Once you’ve chosen this hosting package, click on the option called get started’. This will redirect you to the option of selecting a domain name.
Step 3: choose your domain name
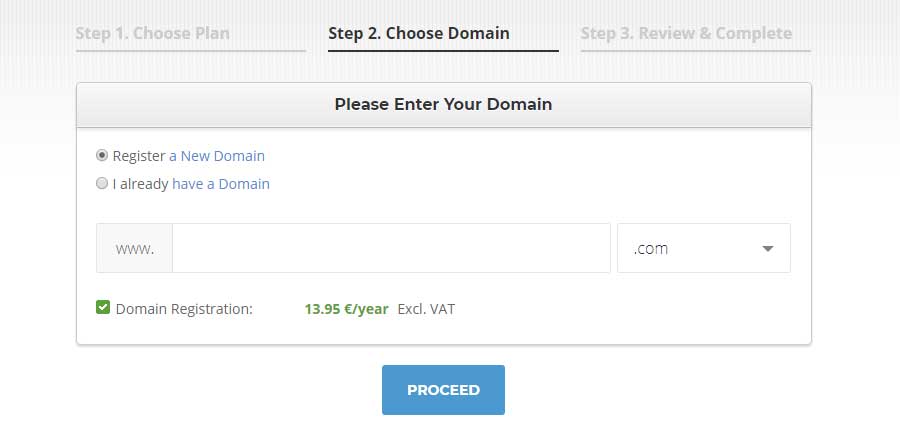
The domain name of your site is going to be the web address via which people are going to identify you and access your website. In other words, your site’s domain name is websitename.com. In case you have a domain name already, check the box called I have a domain name already’. After this, click on proceed to carry on with the remaining process. If, however, you don’t have a domain name of your own; click on the option called Register for a new domain’.
While you might already have some ideas for selecting your very first domain name, here are some additional guidelines for the ones starting out:
- If you are making the website for your company, use a domain name that syncs with your company name. If however, you are making it for yourself, then add your name in the domain name section.
- Do not use any extra characters other than alphabets (including hyphens)
- If available, use .com, because this is the easiest for people to remember.
Step 4: fill in your Details
This is the section where you add your contact details and pay for your web hosting plan. Here, right under the purchase information, click on the option called hosting services’. There, you will find yet another option called data centers’. In this section, choose the location of your nearest data center. If your customer base is primarily from USA, then choose USA in this section.
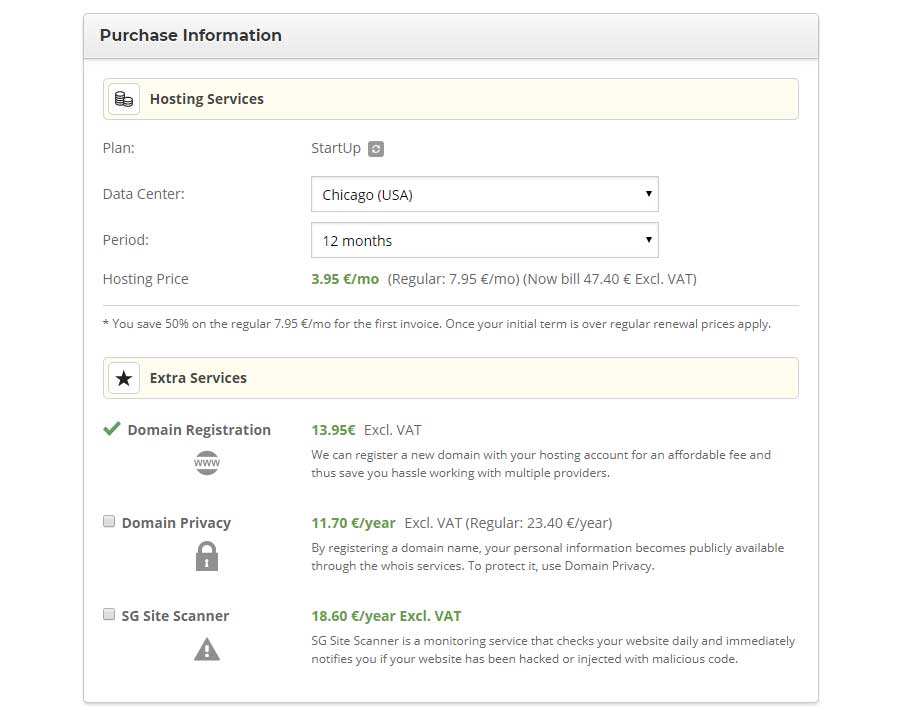
While you create your first domain name, you will also get the option of adding domain privacy. (This will keep your personal information (including your name and address anonymous). You can also add a SG site scanner for scanning your website for malicious software. Both of these options are optional.
Things to do before next step
Z
Choose a domain name and setup a hosting package. I recommend choosing Siteground as your hosting.
Step 3: Set Up your Domain’s SSL
Once you’ve purchased your domain name and have set up a proper hosting plan, you’re one step closer to building your website. In the third step, we will focus on securing your website with SSL (https). Right now you might be wondering what exactly is SSL and how is it going to impact your website. I’ll keep it simple. SSL is the acronym for Secure Socket Layers. As evident from the name, an SSL certificate in your hosting account is going to provide the much needed security for your website. When your website is secure, you will see a green padlock icon in your address bar and instead of starting with HTTP; your web address will now start with HTTPS. Here, the S stands for the security.

If your website starts with HTTP instead of HTTPS’; the Google Chrome browser will automatically flag it as non-secure’ site. Here, even if you’re not accepting payments via your site, seeing the non secure icon is not really going to provide a great user experience.

You’re already aware how difficult it is to garner people’s attention. And having something negative is definitely going to add an adverse impact on this attention. But how exactly does one set up their SSL? Well, with Siteground this is super easy to do.
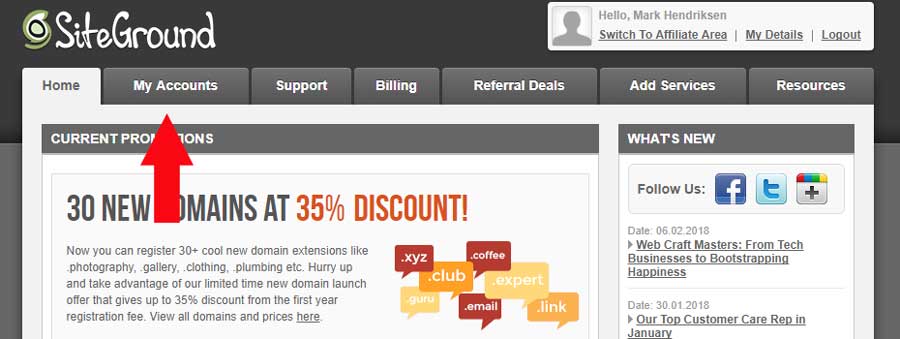
Visit the Siteground website and click on the login option.
Right after you’ve logged in, head to the My Accounts tab.
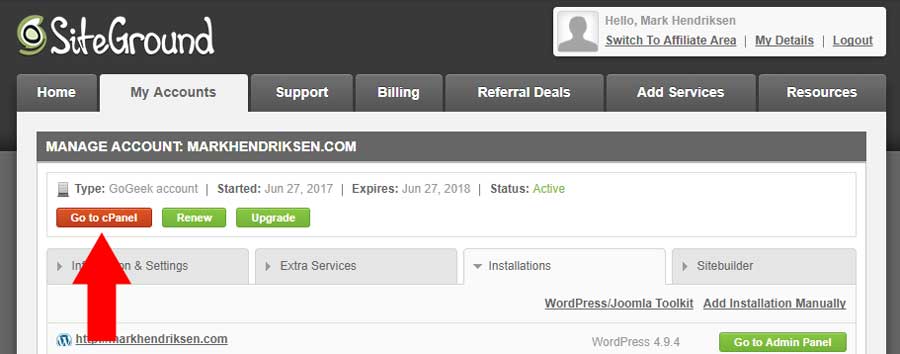
On your next screen, click on the option called Go to cPanel. At this point, you’ll get a popup message where you’ll have to click on proceed’.
On the following screen, scroll down to the bottom until you find the option called Install Let’s Encrypt’s Certificate’. Click on it.

Choose your domain name in the field of domain. Similarly, add your email address on the bar asking you to do so.
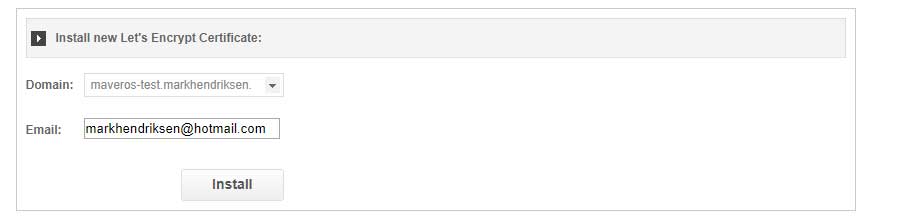
Finally, click on install. The installation will hardly take a minute and will soon let you access your SSL certificate.
Things to do before next step
Z
Set up an SSL certificate and secure your website.
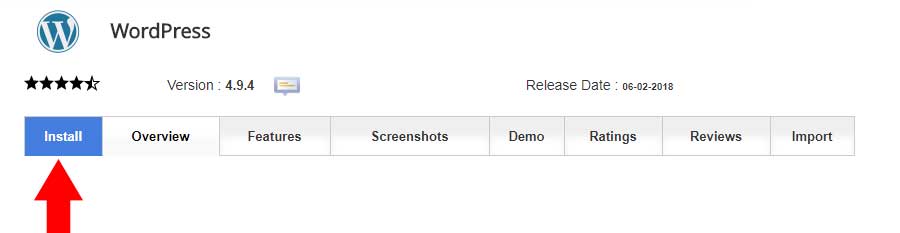
Step 4: Install WordPress
Now that you’re done with the SSL certificate, it’s time to finally install WordPress. As you start out, the first thing that you have to do here is install your domain. Fortunately, with Siteground it is way easier to get WordPress installed and running in a couple of minutes.
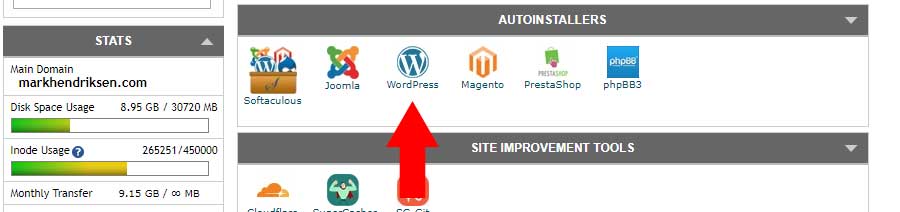
In order to install your domain, head back to the cPanel by either clicking the cPanel option in the upper right section or by simply accessing your cPanel account by visiting www.yourwebsite.com/cpanel. Here, you will find several autoinstallers, from where you have to click on WordPress.
You will then be redirected to the next screen where you have to click on the install option. As you do this, Siteground will now take you through the entire process of organizing your WordPress account.
It’ll hardly take two minutes to complete the entire process. As you start out, you’ll first be asked about the protocol that you’re willing to use. As we are using the https protocol, you will have to choose https protocol’ option. You will now find two options where your protocol is either with or without the www.
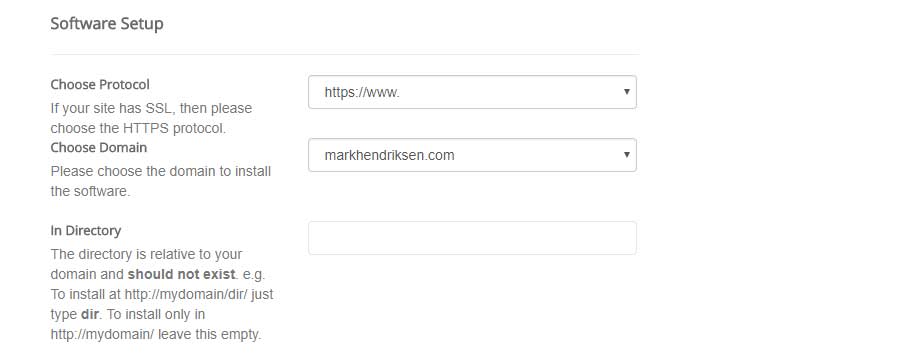
For instance it can either be shown as www.yourwebsite.com, or simply yourwebsite.com. Choose your preferred protocol and then choose the domain where you want to install wordpress. After you do this; head to the site settings, where you will be asked to fill in a title and a description for your website. Fill this section (You can always tweak it later on).
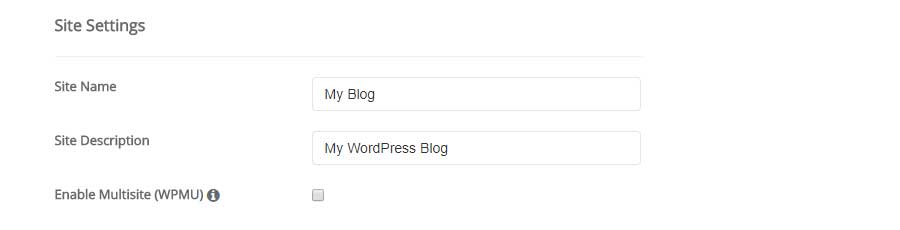
Now, under the Admin account you will have the option of editing your user id, password and email for WordPress.
At this point, in case you’re looking to change the language for your website, simply click the choose language’ option to get started with it. Finally, when you’re done with setting up the basics, click on the install option.
Your WordPress website is now been installed and you can access it by using the information sent to your inbox. This information includes your WordPress username and password, and the admin URL of your website, which should be something like www.yoursite.com/wp-admin
Things to do before next step
Z
Installing WordPress on your domain name
Step 5: Setting up the Divi theme and the free layout pack
After you’ve finally installed WordPress on your domain, you will find a pretty basic and clean website.

But having said that, you don’t really want your website to look like your competitors’ websites; isn’t it? And that is exactly why you’ll need a good theme and design template that’ll keep your site an edge ahead of others.
I have specialized myself in the Divi theme from Elegant Themes and it is for me the #1 theme out there. I build all of my client’s website with this theme and I also build this website with Divi.
Divi has tons of customizations options and you can literally build any type of website with it. And the best part is that it has a live pagebuilder.https://www.youtube.com/embed/q9XI0Lo-SWE?feature=oembed
Setting up the Divi theme
Head over to Elegant Themes.
You can choose out of 2 packages. The difference between the 2 is lifetime access, updates and support.

If you choose yearly access then it doesn’t mean that your website won’t work anymore after that year. It will just keep working you just don’t have access to new updates and features after that year.
Not only do you get access to the Divi theme but you get 89 of their themes + all of their plugins.
With most of the premium themes out there you can only use it once per website. With Elegant themes you can use the themes as many times as you like on as many clients as you want.
So this is a pretty sweet deal.
Installing Divi
When you finished the sign up process head over to their website en login. In you member area you can download Divi.

Save it somewhere on your computer.
Now head back to the dashboard of your website and go to appearance > Themes.
And click on add new

Then click on Upload Theme.

On the next screen you can upload your theme. Click on Choose file and find your downloaded Divi theme. Then press on install now.
After the upload process has finished you can then activate the Divi theme.

Installing the free Localbiz layout pack
Now that you have successfully installed Divi. You can start building your website.
But I have made it easy for you and already build a complete layout. You can download this layout and load it into Divi.
Step 1
I have created 15+ free layout packs for Divi. To download the free localbiz layout package you can create an account here.DOWNLOAD LOCALBIZ LAYOUT PACK
After creating your account navigate to Divi layout packs and download Local biz small business pack.

Step 2
Unzip the ‘Localbiz.zip’ file to your computer.Step 3
Go to Divi > Theme Options. Click on the import/export options (up/down arrow).
Click on Import and upload Express Movers Theme Options.json.

Go to Divi > Theme Customisation. Click on the import/export options (up/down arrow).
Click on Import and upload Express Movers Customizer Settings.json.

Go to Divi > Divi Library. Click on the import/export options.
Click on Import and upload Express Movers Builder Layouts.json.

Step 4
Go to Pages > Add new page
Give your page a title
Activate the Divi builder

On the next screen choose a premade layout

Go to Your Saved Layouts.
Here you will see all the pages from the demo we will now import the home page.

For all the other pages follow step 4 and import the page you like.
Things to do before next step
Z
Installing and activating Divi ThemeZ
Installing and uploading the free layout pack
Step 6: Customizing the appearance of your website
Now that you’ve completed installing the layout pack for your site, it’s time for you to customize its colors and content. The process is easy and is usually completed in the front end of your site. To start out, simply click on the enable visual builder’ and you’ll soon find options for customizing your site.
Divi comes with a great collection of video tutorials. To understand the basics of Divi I recommend to watch at least the basic video tutorials. You can find them here.
Basics Divi builder
https://www.elegantthemes.com/documentation/divi/visual-builder/
Full documentation
https://www.elegantthemes.com/documentation/divi/
I have build a library of step by step Divi Tutorials and Guides from beginner to advanced level. This is a great way to learn Divi and become a better web designer.
Create additional pages
Here are the guidelines that you need to follow for extra pages.
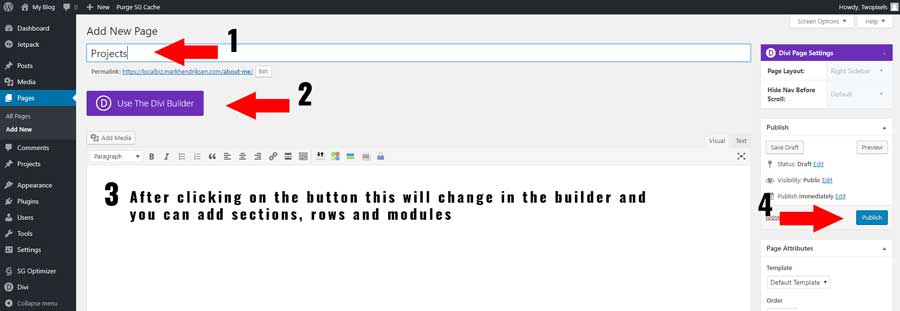
Check the sidebar of your WordPress Dashboard and go to Pages > Add new.
On the next screen add a title for your page. For example About me. Then click on the button Use The Divi Builder. Now you can add sections, rows and modules to this page. You can also do this on the visual builder on the front-end. When you are done click on publish
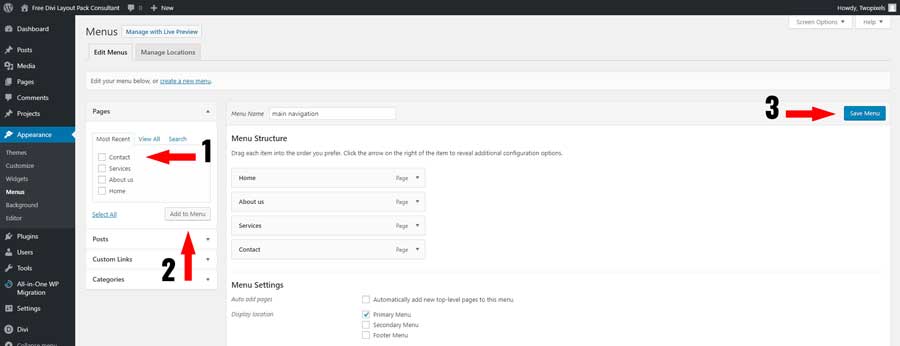
Adding new pages on the menu
If you want your new page to be linked to in your navigation bar,
Go to Appearance > Menus in the sidebar of the WordPress Dashboard
Find the page you created and add it to the list by clicking the checkbox next to it and then “Add to Menu”. Then click on Save Menu.
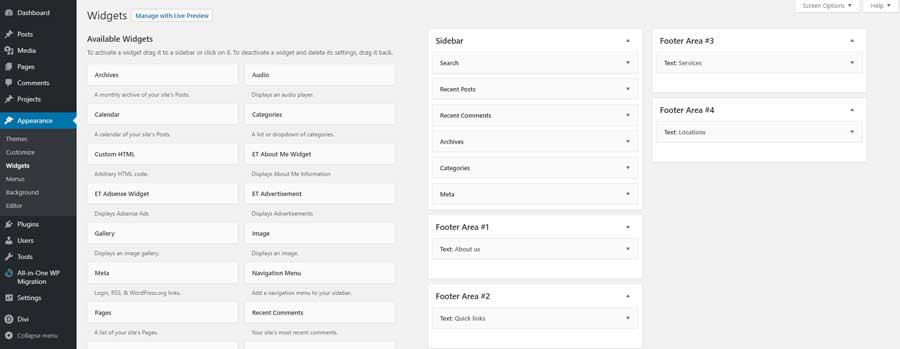
Editing the footer
This layout has a Footer at the bottom of each page.
If you want to change the content of the footer you do that as follow:
Go to “Appearance > Widgets” in the WordPress Dashboard.
From here, you can use drag and drop to add different “boxes” to your footer, or remove the items you don’t want.
Installing Plugins to make the most out of WordPress
Now, even before you install your plugins, you might be wondering what these are. Well, I’ll clarify this doubt. Plugins are nothing but small extensions that are designed to enhance the capabilities and overall features of WordPress.
Plugins can be used everywhere- you can use them for adding new photo galleries, form submission pages or for even creating your online store. How to get a plugin installed? In order to start installing a plugin, simply head to the option called plugins’ and click on add new’. After you do this, you’ll find a host of plugins to pick from. Browse through the 25,000 free plugins to finally choose your preferred option.
Once you’re done with this, simply click on install’. To make things simpler for you, here are some of the popular plugins that I frequently use-
Yoast SEO for WordPress – As evident from the name, this is the plugin that makes your WordPress website more SEO-friendly. It is free and it lets you tweak with the title tags, meta-descriptions and many more features.
Google Analytics – This is the plugin that’s going to help track your traffic and their usual behavior. This one too is free and extremely simple to use.
Essential Grid – This is for those people who are looking to build photo galleries on their WordPress sites. It super easy and incredibly feature-rich.
If you want to make you own customizations I recommend to work with a child theme. You can follow this step by step guide to creat your own child theme: The Essential Guide on How to Make a Divi Child Theme
Congratulations!
Well, now that you are done with the plugins- Congratulations! You’re completely ready for launching your website. If you’ve followed all the steps in my guideline, you should already have your interactive and incredibly functional WordPress website right now. That wasn’t too difficult, was it?
Frequently Asked Questions
How much does Divi theme cost?
The Divi theme comes with 2 pricing options. A yearly fee of $ 89 or a one-time payment of $ 249 for lifetime access. Both options include the plugins Bloom and Monarch.
What is the Divi theme?
The Divi theme is a WordPress theme that uses a drag and drop page builder. With this builder, you can create beautiful websites without the need for any coding skills.
What is the difference between Divi theme and Divi builder?
The Divi theme has the Divi builder in it. With the Divi theme, you also have options for the header and footer. The Divi builder plugin can be used on any other WordPress theme. You can then create pages with the Divi builder and use the other options of the theme.
How do I activate Divi theme?
In your dashboard go to Appearance > Themes. Click on Add New and on the next screen click on Upload Theme. Locate your download file and start the upload. After the upload has finished click on Activate Theme.Can I use Divi theme on multiple websites?
Yes, you can use the Divi theme on multiple websites.Is Divi easy to use?
Yes, Divi is very easy to use. The Divi theme comes with a drag and drop visual page builder. With the visual builder, it becomes very easy to build websites